
When I first received my 1605 ball screws at the beginning of my CNC build I noticed that they were obviously not of the highest quality. In fact, some of the ball nuts had so much play in them I requested that the seller send replacements. The replacements were only marginally better but I was keen to get the build going so continued anyway.
A few years down the track and it seems to have worsened over time. There is a visible amount of backlash in the X axis when load is applied to the spindle head. Using dial indicators I determined that there were two main components to the deflection I was seeing. The first being backlash of about ±0.07 mm from the play in the ball nut and the second being a “springy” axial movement of the whole screw relative to the machine. There was actually a third component attributed to flex in the gantry side plates, although surprising, it was minimal in the scheme of things.

I disassembled the fixed side bearing blocks and sure enough, they contained only a pair of regular deep groove ball bearings, rather than a pair of angular contact bearings designed to withstand axial loading.

At this stage I decided to focus my efforts on the ball nut backlash. In the future I will source some paired angular contact bearings and design a custom fixed side mount.
I had several options to rectify the situation, the first was to repack my existing ball nuts with larger balls. This requires a process of trial and error where the ball nuts are packed with incrementally larger and larger balls until the perfect amount of pre-tension against the screw is achieved. This pre-tension is such that the screw turns freely and there is no play in the assembly, but not so much tension that the nut binds on the screw. These cheaper “rolled” ball screws are also known to have a small degree pitch deviation along their length, which also makes this process that much trickier. I had concerns over the long term robustness of this solution, over the life of this machine the pressure on the components (screw, balls and nut), wear would occur and therefore manifest as play in the assembly. There is also the issue that bearing balls of small increments are difficult and expensive to source in New Zealand.
I had heard good things via the CNCZone forums about a Chinese supplier called BST Linear so I sent Fred an email for a quote on a new ball screw. These screws were advertised as “zero backlash” but I was obviously skeptical. Over the course of several emails, Fred explained how each individual ballnut and screw is manually packed and tuned with the correct size balls to minimise the backlash and account for variation in the manufacturing of the screws. He then offered to send a ball screw to me free of charge (except shipping) for my evaluation, before making payment, I happily obliged. The screw arrived and is pictured in the image below (top) alongside my existing ball screw (bottom). The BST Linear screw was of significantly higher quality than my existing screws and were of remarkable value for the quoted price (USD 22.50 for an 800 mm screw). The finishing was very clean and tidy, no sharp edges or burs, they also had new style rubber end seals rather than the old plastic caps held in by tiny grub screws, these always come loose and are left behind by the nut.
I fitted the new screw to my machine and made some measurements, it was much better and probably adequate for my needs, but still not perfect. There was a small amount of play in the nut at some parts of the screw, and as mentioned before, I was worried about wearing of the contact surfaces over time and becoming worse.

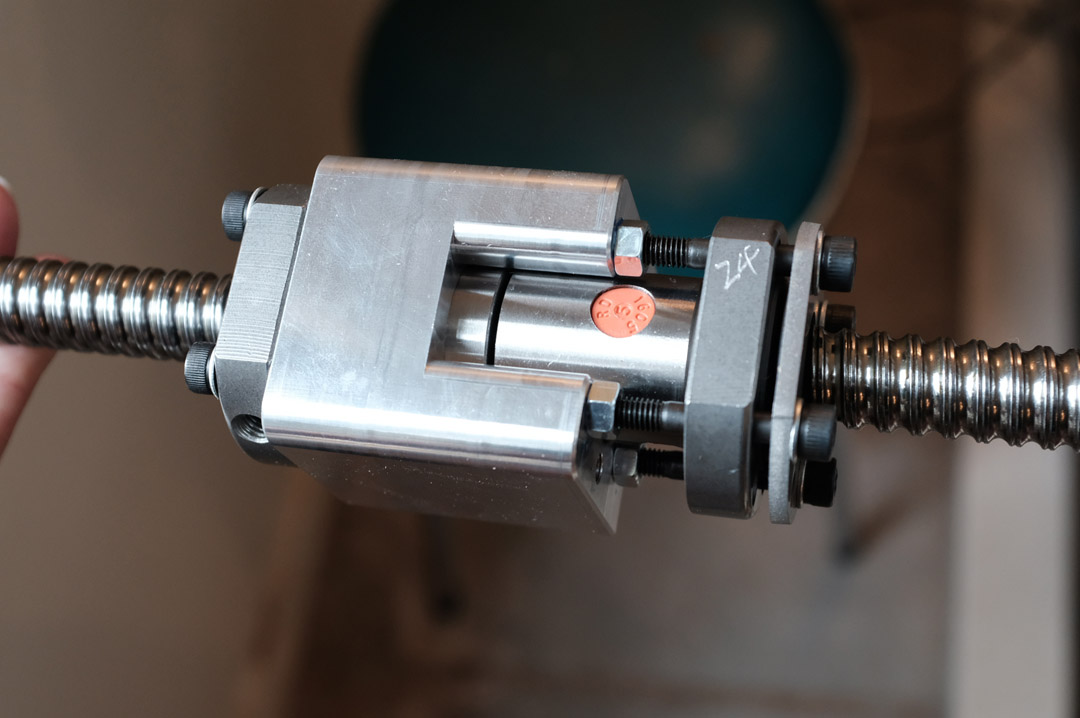
The concept of pre-loading two ball nuts against the screw in opposite directions is something I had seen others implementing so I thought I’d give it a go. The model below is what I came up with, using belleville washers (disc springs) to add pre-load to the assembly.

This configuration shows a “fixed” nut on the right which is rigidly attached to the ball nut mount and a “floating” nut on the left. The “floating” nut is constrained rotationally by the fixing screws passing through it but free to move axially against the belleville washers.
The springs always provide pressure to force the “floating” nut towards the “fixed” nut and therefore “pinching” the screw and resulting in very little backlash. The axial movement of the “floating” nut helps to account for pitch variation in the screw and would also be self correcting for subsequent wear in the screw over time.

I selected 31.5 x 16.3 x 0.8 mm Series C (DIN 2093) disc springs as the inner diameter is just large enough to fit over the 1605 screw. Two springs were placed in series in order to double the workable deflection for a given load. The spring specifications can be seen in the graph below.

After finishing the design I ordered another ball nut from BST Linear. I also went ahead and machined the custom ball nut mount and water-jet cut the pressure plate out of stainless steel plate. The complete set of components can be seen below, Belleville washers, pressure plate, ballnut mount, nuts washers and M5 cap screws.

Fully assembled double ballnut assembly.
Tightening the cap screws against the pressure plate applies force to the disc springs and pre-load is increased. The spring deflection can be determined by measuring the change in the gap between the pressure plate and ballnut. The springs were deflected from 3.7 mm to 3 mm. An individual spring deflection of roughly 0.35 mm, this results in a preload force of 454 N according to the specification. Loctite 243 and locking nuts are used to hold the pressure plate in place and prevent movement.

The assembly fitted to the gantry of my machine and ready to be mated with the z axis carriage.

The results of this modification were very good, almost no determinable movement in the ballnut relative to the screw when loaded by hand. As mentioned above I also think this is the best solution to deal with inevitable wear in the components over time.
The next step in the development of my machine is to figure out how to rigidly hold my ball screws in place and reduce axial movement of the screw. I will most likely use angular contact bearings and a custom fixed side mounting block. If anyone has any tips on which bearings to use, please use the comment section below.
I must also say that Fred and BST Linear was a pleasure to deal with and provides a great product at an amazing price. I will soon be placing another order with him for two ball screws with extra ballnuts to perform the same upgrade to my Y axis.

How difficult is it to turn the ball screw with this arrangement? I am building a double nut setup but I must be doing something wrong as the screw is extremely difficult to turn when I tighten up the assembly up.
LikeLike
Hi Michael,
Yeah I also ran into this issue, I noticed that with the springs I used it’s a fine line between too tight and too loose. I think this is an issue inherent with this design and I’ve been thinking about it a bit recently. I think the only solution is a lower spring rate.
Cheers,
Jeremy
LikeLike
You can just screw the two ballnuts together, the tighter you screw them will affect the rotation. With mine I found finger tight to reduce backlash to zero.
The first nut I’m holding in place with the flange and bolts, the second I’m going to cut a slit in the ball nut mount and bolt through that to make a compression fit. That way if I get backlash I can simply loosen the compression joint and re tighten with fingers. I do have C5 grade ballscrews though which are better than C7 or worse.
Jools
LikeLike
I notice this Blog. I have same issue to deal with backlash.
My method is very simple. just add a nut as same as original nut as subordinate nut.
Between two nuts I put a pair outer ring of damaged angular contact bearing as spacer and effectively pushing the nuts apart. But the nut is radial floating.
So I use a torsion spring to let two nuts against together. The torque is very light and just right keep the subordinate nut can’t turn round while the sercw rotats.
Thus the backlash is eliminate perfect.
LikeLike
Hi, thanks for the comment. Sounds like a good solution, do you have any photos?
LikeLike
Thanks for the fantastic article. It’s very difficult to find such detailed reports. I’m book marking your page and I’ll make sure to visit once in a while for more great content. I’ll definitely try this method!
LikeLike
Spacers between the nuts are better than and more controllable than springs. The spacer is made of nylon or some sort of plastic, the preload can be calculated easily, for example if the lead of your ball screw is 5 mm, then the half turn of ball nut gives you axial movement by 2.5 mm
You can turn a spacer with 2.55 mm as a preload of 0.05 mm and put it between the two nuts. It is the same exact idea of commertial double nut.
Thanks
LikeLike