Update (Aug 2023): I have had quite a few requests for the CAD model of this workbench so I have made the 3D model available for purchase on my Etsy store. The model contains all the timber components and also the vise hardware which is useful if you want to fabricate your own leg vise.
I think a sturdy and functional workbench is a necessity for any serious woodworker. It makes for a much more enjoyable experience, especially when working with hand-tools.
Initially I intended on building the Moravian Workbench, I was attracted to the portability and how easy it was to assemble/disassemble. I began to source material and was was about to start making my first cuts when I began to have second thoughts. In the back of my mind I always knew that I preferred the straight leg aesthetic of the French Roubo style benches, ultimately this led me to combining both designs into something which suits my needs.
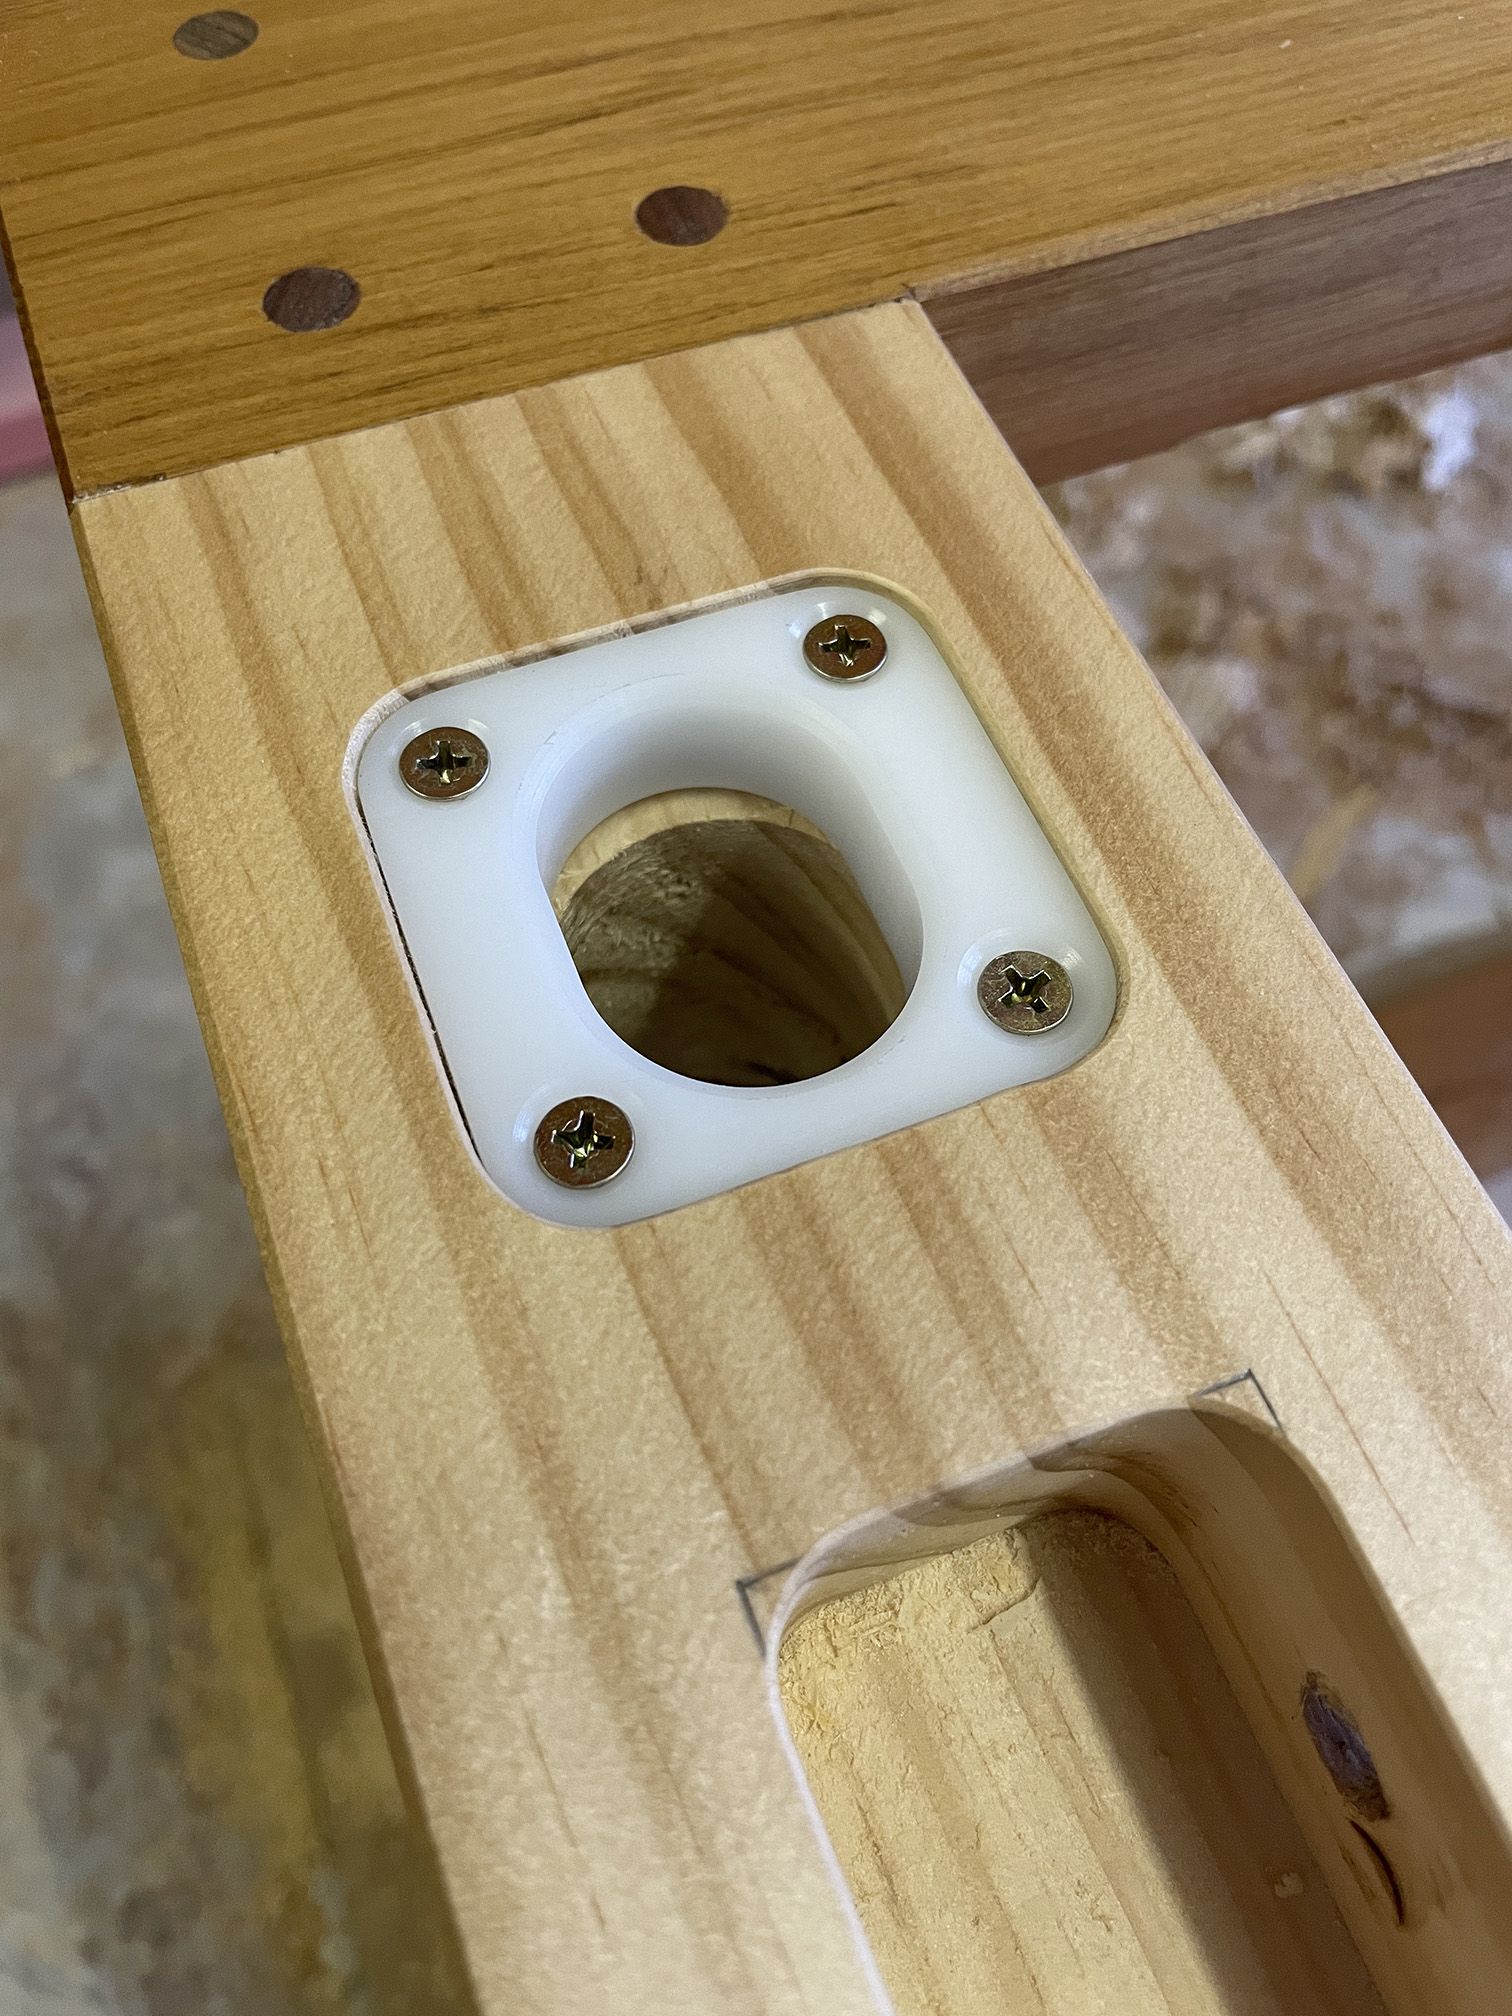
Traditionally a Roubo bench consists of legs which are mortised into the underside of the bench top but I was drawn to the idea of having a removable top, mainly for portability and ease of maintenance. The trouble with this arrangement is that without the fixed connection to the bench-top I was worried the bench would lack rigidity. My solution to this is to have upper rails connecting the legs which create a rigid base assembly. The one main downside I see is that it is slightly more awkward to clamp workpieces to the bench-top using clamps. It can still be done but the clamp must register on the bottom of the front rail rather than the underside of the bench-top. I had also planned to also use holdfasts which would reduce the need for clamping anyhow.
When I finally got around to building this bench I really just needed a workbench, I was time-poor, due to family/work commitments etc. and didn’t have a lot of time to devote to the build. The mortise and tenon joinery used in a Roubo style bench is the traditional “proper” way to go about it, but is also time consuming. In the end I settled on lap joints for the base structure which were glued, screwed and had the holes plugged with walnut dowel. This turned out to be a very efficient way to construct the joints and has proven so far to provide excellent performance.
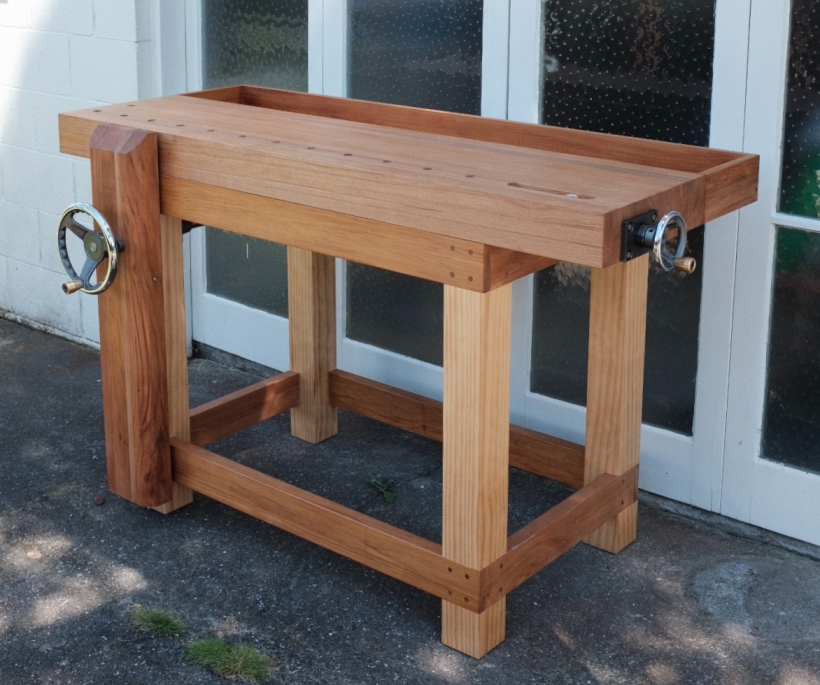
The finished dimensions are 1500 mm long, 920 mm high and 600 mm deep (including the tool-tray), the main work surface is 365 mm deep.
This is the timber which I had collected for this project, a mixture of clear pine dressed to 90x90mm, ‘Fijian Rimu’ and reclaimed NZ native Rimu.
The dressed pine was used for the legs, Fijian Rimu for the top and NZ native Rimu for rails.
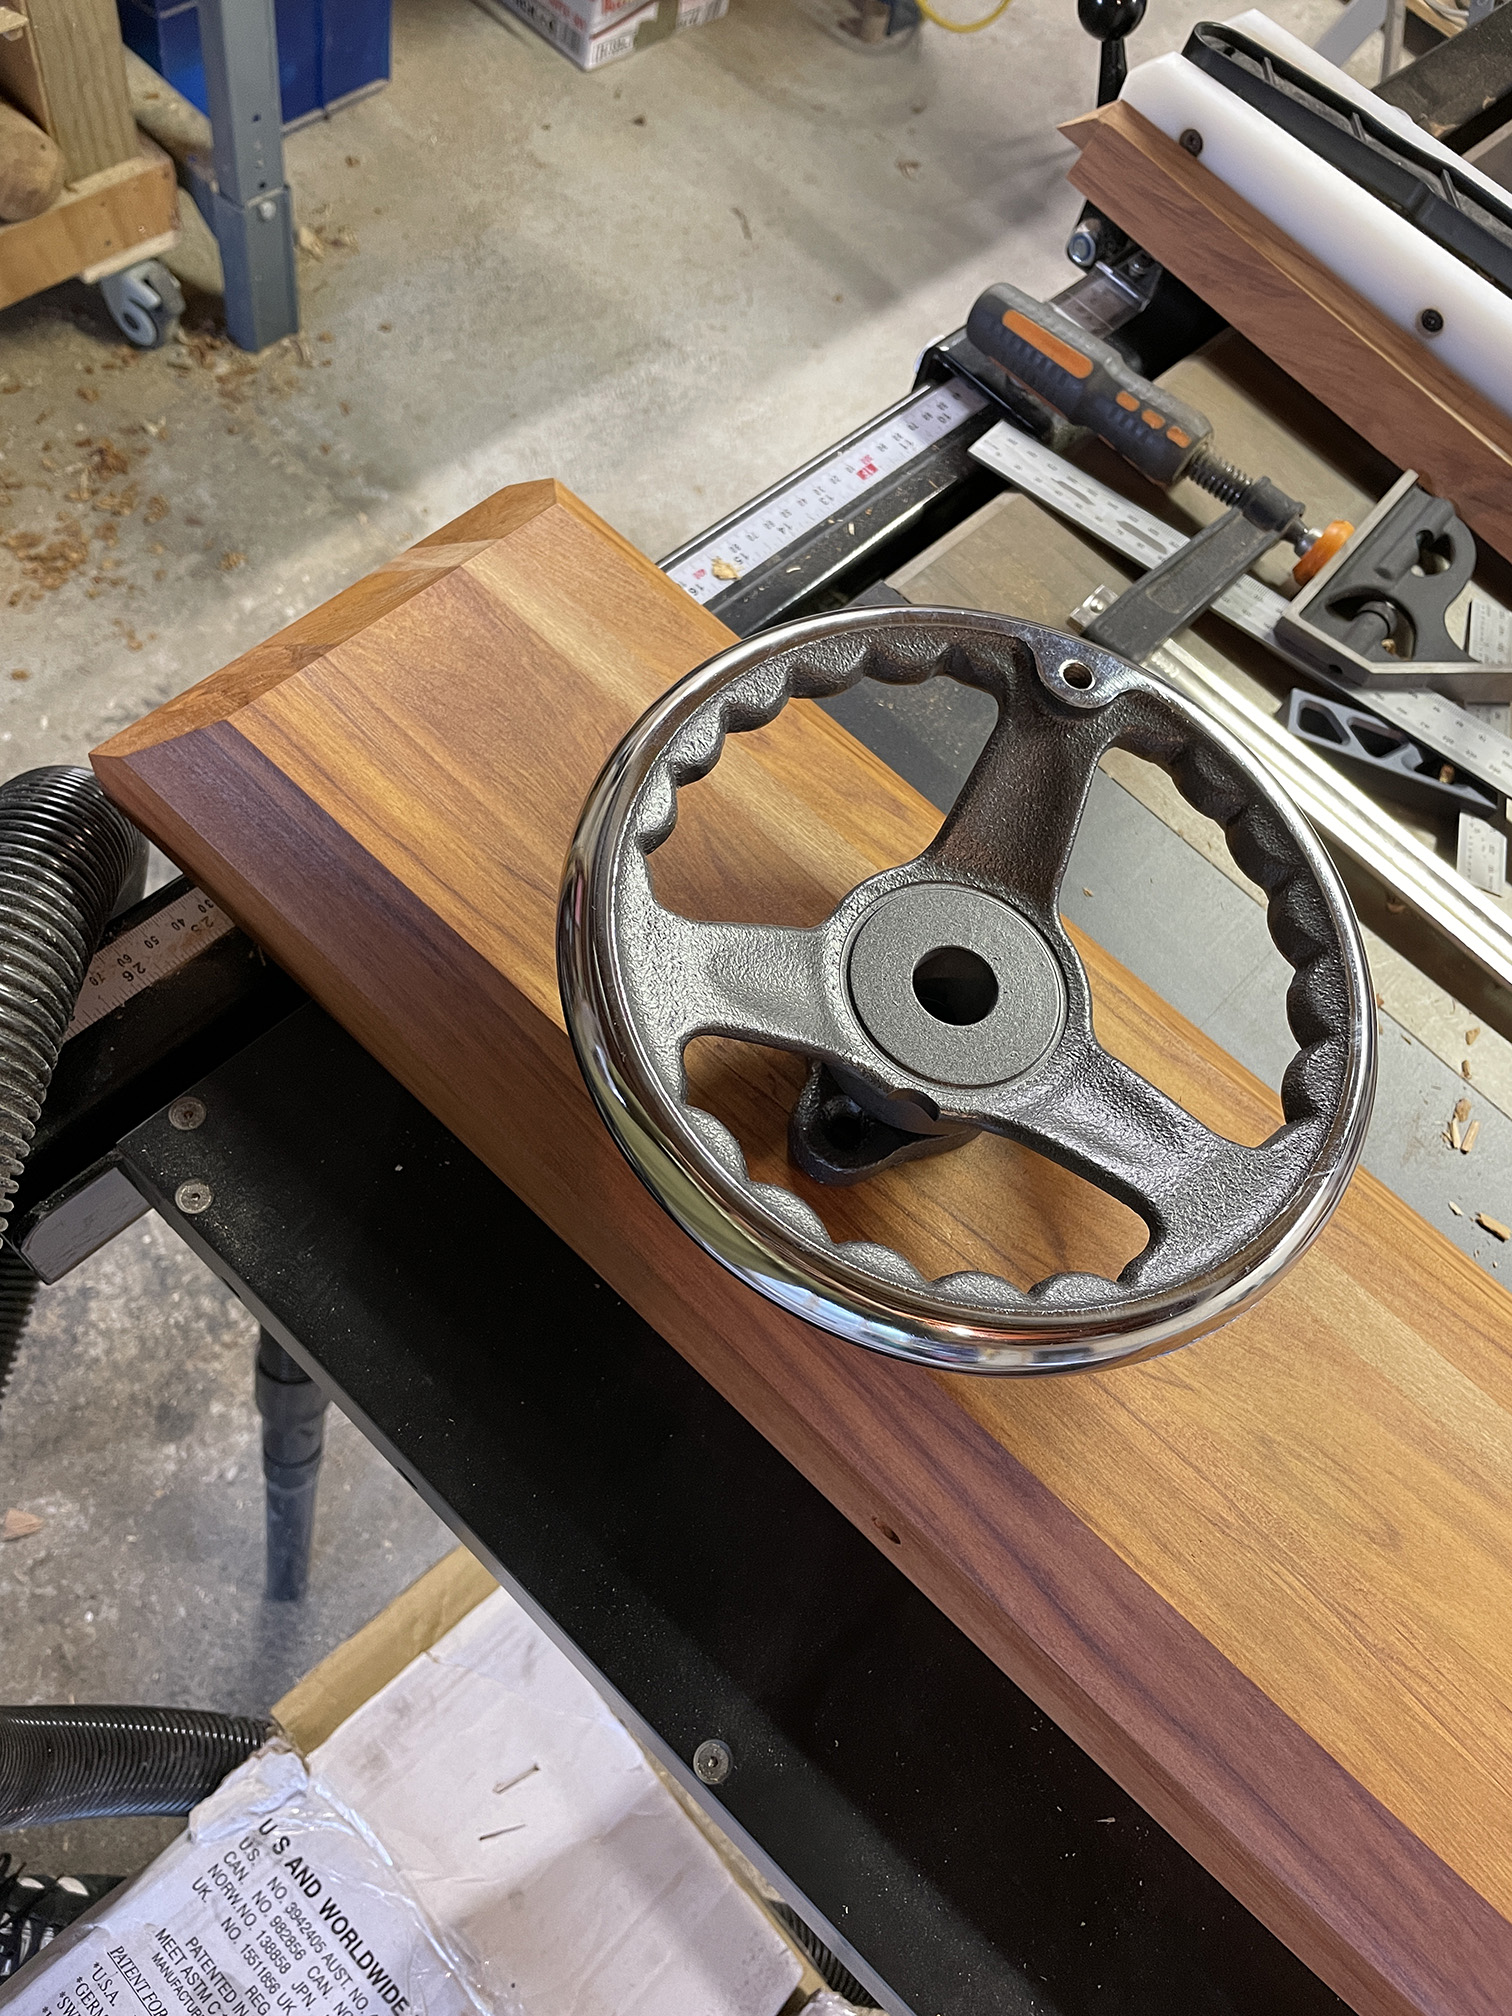
The first step was laminating the bench-top, I did this in two sections which were narrow enough to fit through my thicknesser.When it came to thicknessing these large pieces I noticed the sides weren’t square with the faces. This was caused by the individual pieces sliding during the clamping process and skewing the whole lamination.My approach to fixing this was to attach (with a small amount of CA glue) a thin shim to the bottom of one side.This squared up the sides nicely.I ran it through the thicknesser a few times to clean up the top. Then I flipped it over, removed the shim and a few more passes cleaned up the second face, parallel to the first and perpendicular to the sides.Assessing the join, there was a slight gap in the middle.I don’t have a jointer so resorted to my Stanley No.6 to joint the edge.Final glue-up joining the two pieces, I made sure to get as little mismatch in the joint as possible to minimise cleanup required.Cleaning the surface up using hand planes was a very satisfying experience.On to the stretchers, this is a very old rough sawn NZ native Rimu beam. The majority of timber houses built prior to the 1980s in New Zealand were full of timber like this, unfortunately it gets thrown out and sent to the landfill all the time as people renovate their old houses.It’s a shame to see it go to waste as a few passes through the thicknesser reveals a beautiful usable timber.All the milled timber, the legs were purchased “dressed four sides” and I only had to cut them to length.I used a dado blade which allowed me to quickly and accurately cut all the joinery needed for the base.It took less than a couple of hours to cut all the joinery for the work-bench base.Test fitting. I used a block plane and a chisel to fine tune some of the joints, it would have been really nice to have a rabbet or router plane.I cut some grooves into the inisde faces of the stretchers in case I wanted to use buttons to hold the top in place. I didn’t end up using these, the top was plenty heavy enough to stay in place.Pre-empting the leg vise installation and drilling a couple of holes through the leg while it’s still easy to fit in the drill press.Starting to drill holes to assemble the leg frames with fasteners.The complete base frame, all the joints were glued and screwed together. A No.4 plane was used to flush all the joints and make everything nice and smooth.I applied a generous chamfer to the bottom of the legs to avoid chip-out.Chamfers all round.Plugging all the screw holes with contrasting 10 mm walnut dowel.For the first time, it functions as a usable workbench.The frame got two coats of Danish oil.Bench top was trimmed to length using my track saw.I decided to use these chunky 60 mm dowel offcuts I had left over from a previous project as locators for the bench top. Holes were drilled into the top of the frame legs using a forstner bit in a hand drill and the dowels glued in.Corresponding holes were drilled into the underside of the bench top. Very careful marking and checking was needed to get these in the right location.The top just drops onto the dowels and is held steady with no room for lateral movement.This is the screw I purchased off amazon to use on my leg vise.I decided to have a go at fabricating the traditional ‘scissor type’ leg vise mechanism. These were water-jet cut from 12 mm steel plate.The holes were cleaned up using a drill and reamer.This is a custom pin/bolt which acts as a pivot between the two scissor components.More reclaimed NZ native Rimu.Laminated to form the vise chop.Roughing out the space for the leg vise hardware.A laser cutter is great for making router templates, a real time saver.Using a router with a template bit to clean up the pocket.A similar procedure on the bench leg, except this time using a hand drill.Cutting the large bevel on the top of the vise chop.I fitted metal plates into the recesses to provide a smooth metallic surface for the scissor legs to slide against.I used a shim behind one of the metal plates to achieve a slight angle in the chop relative to the bench leg. This ensures that the top of the chop contacts first and provides pre-load.I purchased these generic cast iron hand-wheels for the two vises.They needed some modification to get them to interface with my vise screws.Opening up the centre hole with a drill.Boring to a perfect fit.Drilling for a cross pin to lock the two components together, slightly questionable clamping arrangement in the mill.I decided to take a small scallop out of the centre boss of the hand-wheel to allow for easy access to the screws in the flange behind. This makes it possible to remove the screw from the bench without removing the handwheel.Quick coat of paint.All of the leg vise hardware ready to assemble.I found that the vise screw had too much side-to-side slop, so decided to make an acetal guide bushing.
The vise functions great and spins freely, as seen below.
Now to begin work on the wagon vise. These parts were salvaged from an old milling vise which had the handle accidentally broken off, repurposing it for a wagon vise is ideal as the thread is left-handed.Unfortunately the end was damaged and actually quite bent.It was mounted in the lathe and I managed to make something which was workable. I removed the damaged and bent material, profiled and cut a new thread to suit the existing lock-nut.I machined a custom part to act as a dog holder which is mated to the vise nut and protrudes up through the bench-top.The existing nut with an internal thread which matches the vise screw. I machined this down and removed most of the excess material.Heavily slimmed down vise nut and dog holder.The mounting plate was also slimmed down and excess material removed to suit my needs.Now to fit it to my bench top. Careful planning along with many laser cut templates.Brass hardware and custom acetal bushings.The finishing touch.Wagon vise hardware ready to be assembled.
I really like this minimal look with just a slot in the bench top.I marked and started all of the dog holes in the benchtop. The benchtop is lifted on top of 4x2s, with one being placed directly under the holes, this will reduce tear-out as the auder breaks through the bottom surface of the benchtopA block of wood is used to keep the auger bit perpendicular to the surface.The last major component is the tool tray. Here I am planing the edge of the tray back, making use of the leg vise and a clamp to securely hold the workpiece to my bench.The back and two side pieces.Preparing to glue up the tool tray frame.The rare occasion where your workbench is exactly the right dimensions.As per the base frame, the joints were glued, screwed and doweled.Cutting a piece of thin oak veneered plywood to use as the tool tray base.The tray base simply slides into the grooves in the frame and is secured with a nail at each end. I left the nails slightly proud in case it needed to be removed in the future.The hardwood battens are glued along the front edge to provide stiffness to the plywood base.The tool tray set in place.The top and tool tray were also given two coats of Danish Oil. This finish is easy to apply and should also be easy to repair when I inevitably need to refinish the top surface of my bench.
Below are some images of the bench in its final form.
After having this bench in my workshop for several months I have realised how much of an asset it is to have a solid work surface with good work-holding options. It really makes working with hand-tools much more enjoyable.